This blog is all about animation, digital art and creations. You will also find references and character model sheets which may help you in 2D animation projects.
In this tutorial I will show you how to make beautiful floral fractals in Photoshop CS3 or higher.
First, launch photoshop and create a new Document with 1920x1080px and 300 resolution.
Fill the Background with black colour.
Now with the Custom shape tool, create some flowers and line them up from smaller to bigger sizes as shown below.
Colour them as you wish. Make sure all the shapes are in a single layer, if not, them select the layers using the shift key and merge them by pressing Ctrl+E.
Duplicate this layer by pressing Ctrl+J.
Press Ctrl+T in your keyboard to activate Fee Transform mode. Now, rotate them and also make the size a little smaller than the previous one.
Now press Ctrl+Alt+Shft+T as many times you want to repeat and a spiral will start forming. When its done, select all the layers and merge them [Ctrl+E].
Duplicate the spiral layer and press Ctrl+U for Hue/Saturation. Change the value of Hue to get different colours. Once you are happy with the colour, press OK or Enter.
Keep duplicating the layers, resize and rotate them as you wish and fill the page.
Make a large flower and go to Filter--Blur--Gaussian Blur --Radius 8.5 .This layer should be placed below all others.
Now, take a soft brush and set the foreground colour to white. Click at the places you want to add some shine.
Set the mode to Overlay and opacity 76%
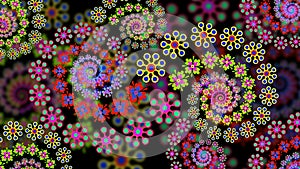
This is the final result.
I uploaded this image in Dreamstime and someone bought it recently. :) Click on the image to view details..and you can buy it from there...!!
Open Adobe Illustrator and create a new RGB document.
First you need a nice picture of a real object. I have taken a picture of oranges [that's my favourite fruit ;) ]
Click on File--Place--select the picture--OK.....or simply drag & drop the picture to your workspace.
Keep the image selected and click 'Embed' .
Go to View--check Smart Guides and Snap to Point.
Create a new layer in the layers panel. Start by creating lines with the help of pen tool (P). First create the border and then form quadrilaterals (four sided geometric shapes). Next divide the quadrilaterals into triangles by drawing lines inside them.
When it's done, it will look something like this image below.
Turn off the visibility of the reference picture layer. Now you can see the cage. When you are happy with the result, start colouring , here is where the fun begins.
Select all Ctrl+A and press "K" on your keyboard to activate the live paint bucket tool. Click anywhere inside your drawing. Now you can colour the triangles each one separately. Press "I" for eye dropper tool. Click inside a triangle to get the colour, press K and click on that triangle to fill colour. Repeat this process for all the triangles. This will take some time, so be patient. Keep colouring and colour all the triangles.
When you have finished colouring, select all again and turn the stroke colour off to see the result.
Select a nice colour for the background. It's done.
This is my final image. Click on the image to download. Hope you enjoyed the tutorial. :)


