
In this tutorial I am going to show you the steps for creating a sparkling glitter text effect in Adobe Illustrator CS3 or higher.
This is the video tutorial for the glitter text effect.
First take a Basic RGB Document 1024X768 pts. 72 ppi resolution and artboard orientation Landscape.

Next, select the rectangle tool and draw a rectangle of the size of your artboard and fill it up with a radial gradient of a lighter and darker shade of the same colour. I chose red, you may choose any colour you like. Keep the layer locked. It is your background layer.


Create a new layer, select the Text tool and write any text you want. I wrote "Merry Christmas" :) Choose a good font and keep the size 200 pts. , you may resize it according to your font style.
Now select the text, go to Object and click on Expand. Next right click on the text and click on Ungroup. Select all and fill it up with white colour, turn off the stroke.


Now press Ctrl + A / Select all and Ctrl+C to copy. Make 2 more layers and in each layer press Ctrl+F to paste the text in same position. So, there should be total 3 layers with the same text.
Turn off visibility for the 2 upper layers and also keep them locked. Select the text in the lowest layer and fill it up with the second gradient in the metals rack.


Keeping the text selected, go to Object - Path - Offset Path -- Offset: 2, Joins: Miter, Miter Limit: 4. This will increase the thickness of the text. Now, lock this layer.


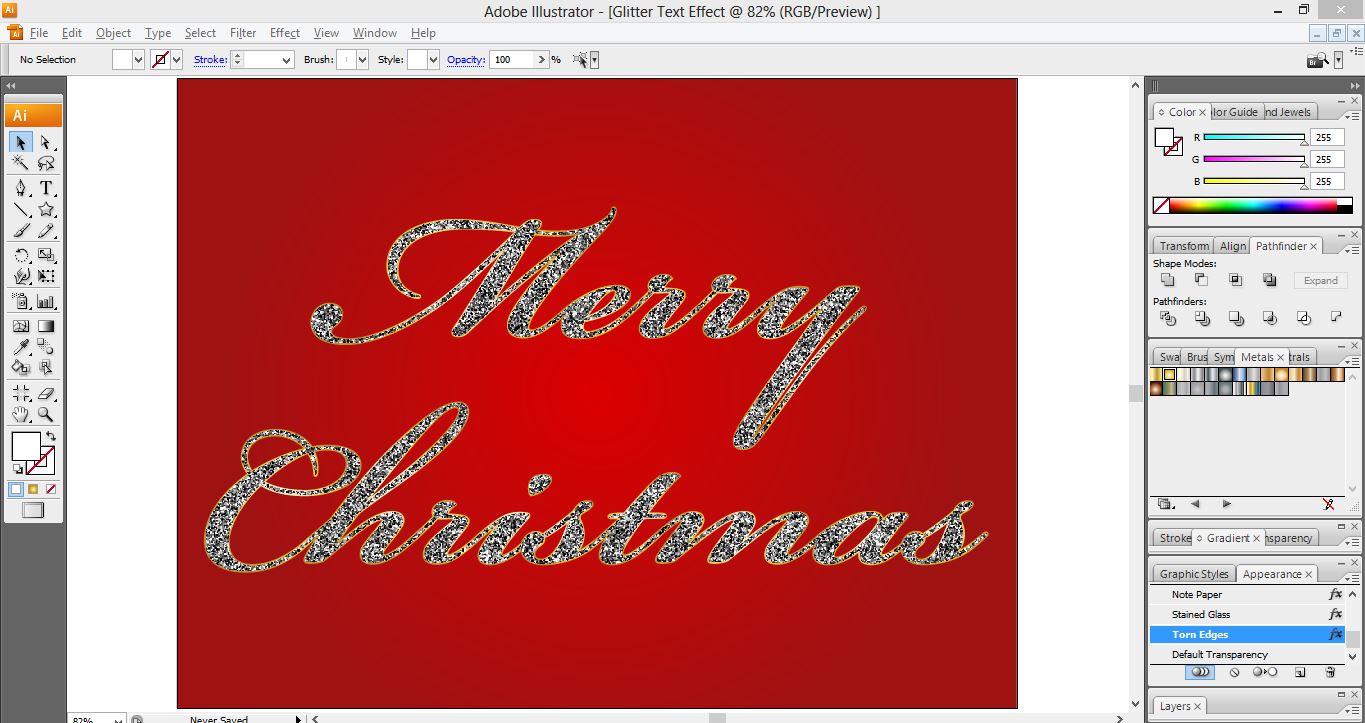
Turn on visibility for the second layer. Select the first letter, go to Effect- Sketch- Note Paper -- Image Balance: 25, Graininess: 10, Relief: 11. Press- Ok. Now, select the other letters and go to Effect- Apply Note Paper (Ctrl+Shft+E).

Select the first letter again, go to Effect- Texture- Stained Glass-- Cell Size: 2,Border Thickness: 4, Light Intensity: 0. Press Ok. Apply this effect to the other letters as before.

Now, again select the first letter, go to Effect- Sketch- Torn Edges-- Image Balance: 22, Smoothness: 1, Contrast: 16. Press Ok. Apply this effect to the other letters too.

This is how it should look.
Now lock this layer and turn on visibility for the topmost layer. Set the blending mode of this layer to color or overlay. Select each individual letter and give it a separate colour. You may change the colours and blending modes to get the desired effect.
Happy with the results?? Good. Now, there is just one little thing left to do.
Create a new layer at the top of all the others. Keep the foreground colour white. Select the star tool. Click anywhere. In the options box -- Radius 1 : 3pt, Radius 2: 50 pt, Points: 5.


Select the star, Ctrl+C , Ctrl+F, resize and rotate the new star. Select both of them and group them (Ctrl+G). Now go to -- Filter- Outer Glow-- Mode: Screen, Colour: White, Opacity: 75%, Blur: 8 pt.
Select the star and make it smaller. Make several copies of the star and place them on the text to complete the sparkle effect.
This is the final image.
